
0102 - Custom Template
The stars indicate the difficulty level of the topic covered in each video.

Subtitle in EN / ES / PT

Examples to download and use in your practices:
Download
0101 - Example - Dimensions Styles.dwg
Download
0101 - Example - Text Styles.dwg
Download

Objectives:
- Understand the process of starting a new drawing in ARES Kudo.
- Learn how to customize and create templates to streamline workflows.
- Transfer and manage elements like layers, dimension styles, text styles, and viewports between drawings.
- Configure Paper Space sheets with pre-set sizes and title blocks.
Functions that you will learn in this lesson:
- New drawing: Starting a new drawing and choosing a template.
-
Settings and Preferences:
- Adjusting grid settings, orthogonal snaps, and polar snaps for user preferences.
- Adding preconfigured elements such as title blocks and viewports to templates.
- DWT Format: Saving and managing templates in DWT format.
- Copy elements between open drawings: Layers, Dimension Styles, Text Styles, and configuring and managing Paper Space sheets with multiple sizes.
Mouse functions that you will learn in this lesson:
- Right-click: Access context menus for operations like pasting entities.
- Left-click: Select entities, dimension styles, and layers for copying and pasting.

When starting a new drawing in ARES Kudo, the first thing that appears is a window allowing you to choose between two templates: one preconfigured according to ANSI standards and the other based on ISO standards.
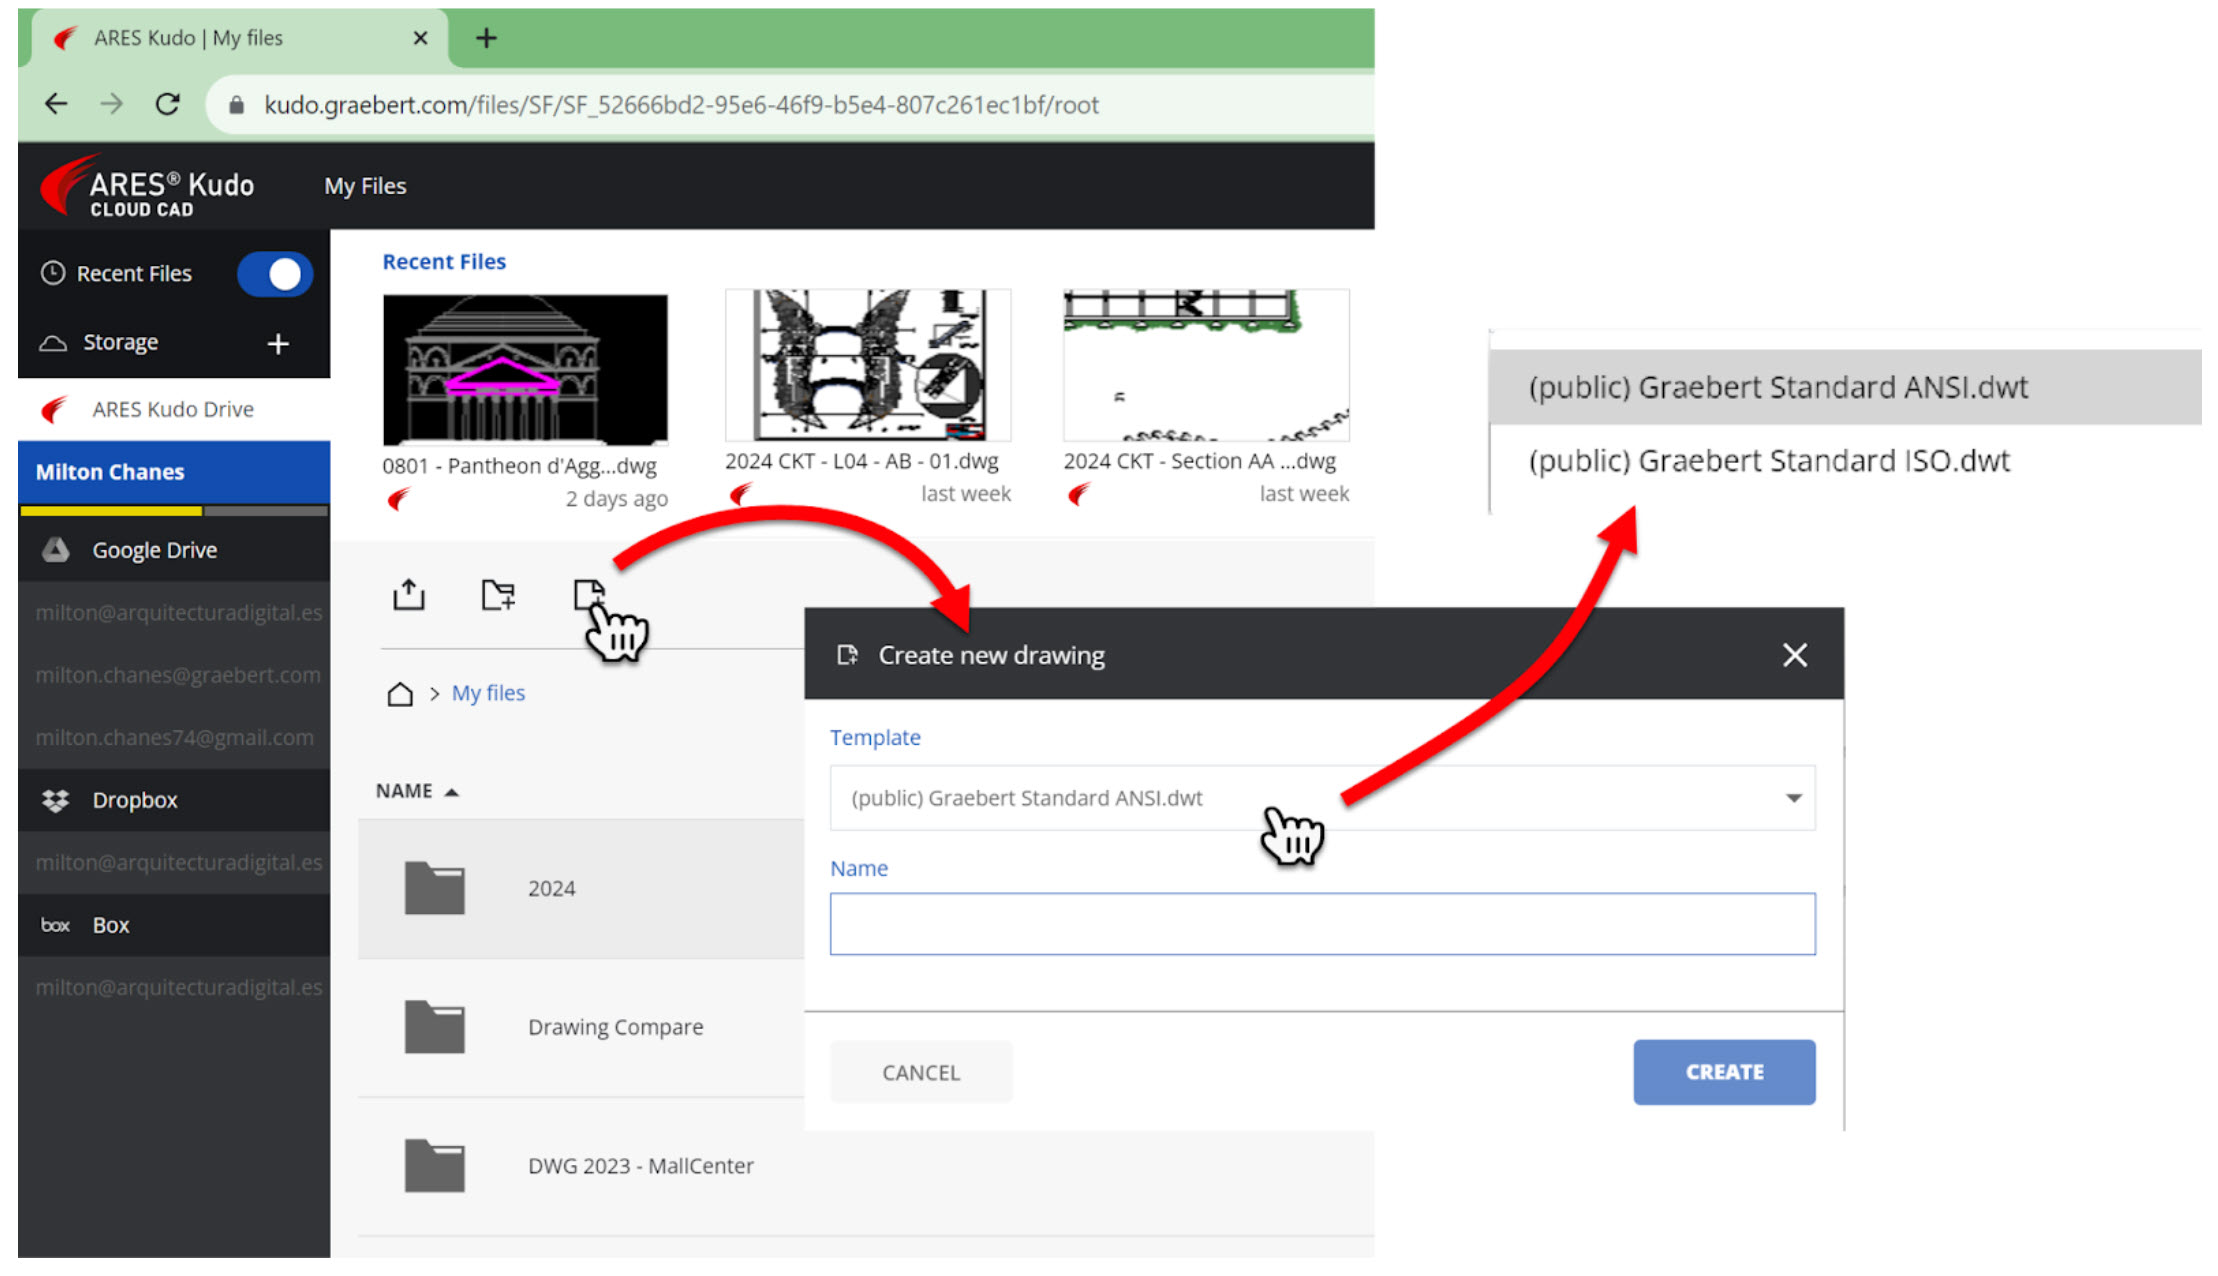
0102.01. Default ANSI and ISO templates in ARES Kudo.
Do not forget that ARES Kudo is a CAD in the cloud and therefore, the templates are also saved in the cloud. This is an important difference with ARES Commander, which contains the templates (DWT format) saved in a folder on your hard drive, just like other traditional CAD.
To add custom templates we must go to the Resources option in the menu related to our user account, where we can choose the My Templates option, where we find a button that allows us to upload the DWT format files, that is, the standard template format.
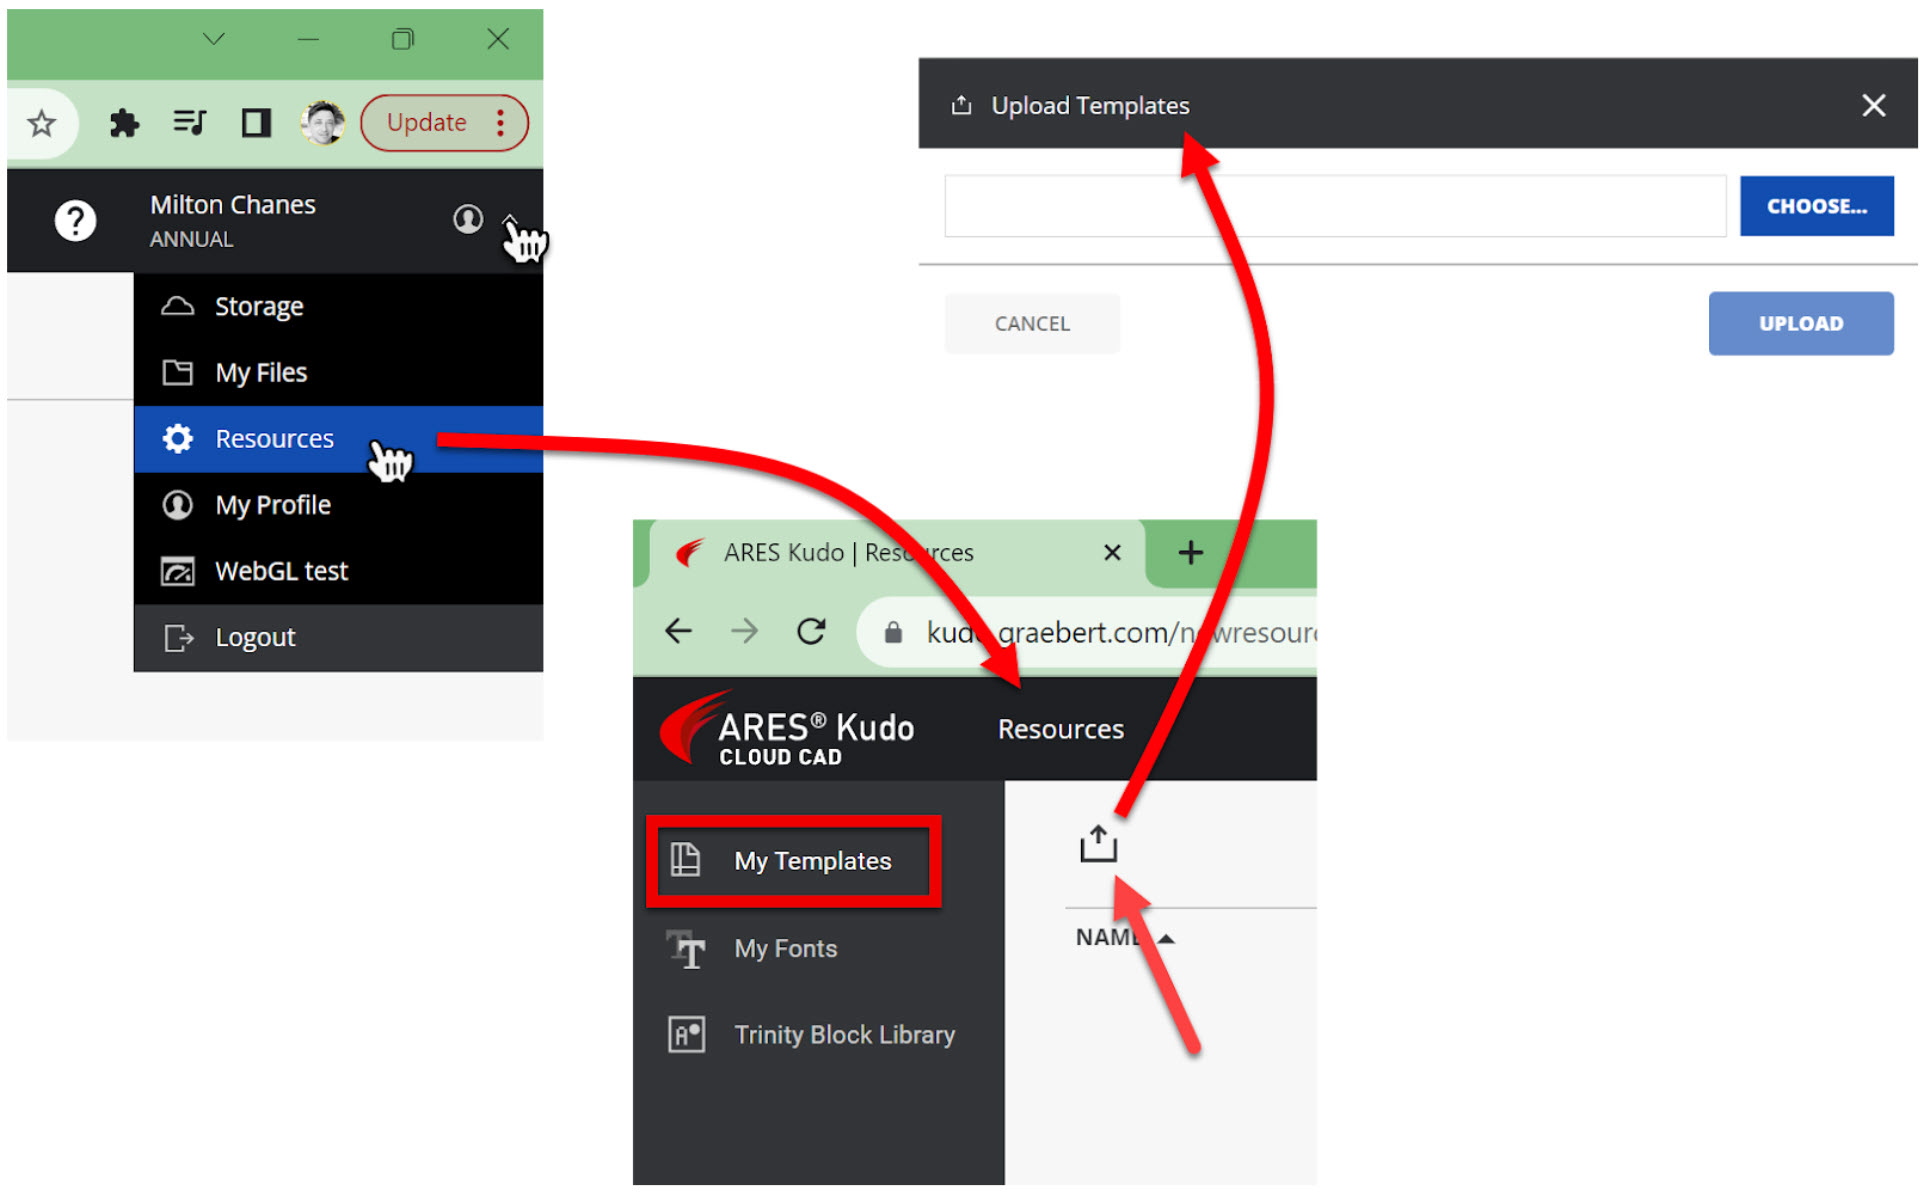
0102.02. “My templates” in the Resources option in ARES Kudo.
This means that if you already have a custom template style (or several) that you use with ARES Commander or even AutoCAD you could upload it to the cloud to use in ARES Kudo.
When is it necessary to create a template?
Working without a custom template is not recommended. Your template can be as simple or complex as needed, but the truth is that without one, you will likely repeat unnecessary steps every time you start a new project. Often, this results in copying and pasting elements from other drawings, which is not a bad practice but is a process that can be streamlined with the right template.
The steps to create a template are straightforward. First, start a new project using one of the existing templates (ANSI or ISO). From there, you can either configure the elements you frequently use or import settings from other drawings.
If you prefer to create elements from scratch, such as a dimension style, you can follow the steps covered in Module 7 of this course. Similarly, text styles can be created following the instructions from Module 6. However, in this instance, we will focus on reusing preconfigured elements from other drawings to save time.
Once all necessary elements are prepared, you can save the file in the specific directory that ARES Kudo uses for templates. This process will be explained shortly.
Before proceeding, it’s essential to note that there is no single, perfect template. The choice of template depends on the type of drawing being created, beyond the standard used (ANSI or ISO). Even within the same project, different templates may be required depending on the drawing type: architectural, structural, or prefabricated elements.
In many companies, the person responsible for standardizing CAD or BIM processes defines the criteria and creates templates for each scenario. This ensures that technicians only need to start their drawings using the appropriate template for the task at hand.
Key Elements of a Custom Template
To create a custom template in ARES Kudo for professional 2D drawings, it is essential to focus on the organization and visual consistency of the design, making it easier to create uniform and efficient technical drawings. Below are the key aspects to consider:
1. Layers and Layer Names
- Names and Conventions: Use a clear and consistent naming convention, such as "A_Walls," "S_Structure," "E_Electrical," "N_Dimensions," "X_Viewports," etc., to facilitate organization and filtering.
- Colors and Lineweights: Define specific colors and lineweights for each layer, aligned with printing standards or on-screen display requirements.
- Layer Locking and Settings: Decide which layers should be locked, hidden, or visible only in certain viewports to enhance the visibility of key elements.
2. Text Styles
- Fonts and Sizes: Choose professional fonts like Arial or Tahoma that are legible both in print and on screen. Use predefined sizes based on the type of text (title, subtitle, annotation).
- Text Formatting: Apply formatting such as bold or italics only when necessary to highlight critical information, avoiding excessive variations.
- Alignment and Spacing: Set uniform alignments and spacing to enhance the design's aesthetics and readability.
3. Dimension Styles
- Units and Precision: Set the units (millimeters, meters, inches) and decimal precision to avoid issues with critical dimensions.
- Arrow Styles and Text Sizes: Choose an arrow style and text size that are legible and suitable for common printing scales.
- Spacing Settings: Adjust spacing to improve readability in dense drawings, ensuring dimensions are clear and do not overcrowd the view.
- Consistent Style: Use a single style or specific ones for different types of drawings (e.g., architectural vs. structural) to maintain consistent formatting.
4. Custom Sheets (Layouts)
- Size and Scales: Create layouts for standard sheet sizes (A0, A1, A3, etc.) and define appropriate scales for each type of drawing.
- Borders and Title Blocks: Design a custom title block with automatic project information fields (project name, client, date, drafter) using attributes or dynamic fields for automatic filling.
- Print Areas: Set a clear and consistently positioned print area on each custom sheet.
5. Block Library
- Standard Blocks: Prepare a list of common blocks, such as furniture symbols, electrical installations, plumbing elements, and other frequently used items.
- Attributes and Dynamism: Configure blocks with attributes for text fields that can be automatically filled (item number, description, etc.).
- Block Library: Organize blocks into folders that facilitate searching within ARES Kudo through the Trinity Block Library. Include dynamic or scalable blocks if the project requires them. Avoid overloading the template with blocks that could be stored in the Trinity Block Library and reserve the template for only the most essential ones, such as those used in the paper space configuration.
These recommendations are based on the topics covered in this course and summarize, in a way, the elements that could be preconfigured in a custom template to save a lot of time by avoiding the need to create elements that will inevitably be used repeatedly in your 2D drawings.
Custom Template
When creating our personalized template it is better to start with the option that is closest to our needs. As by default we only have two options, one designed in the metric system and the other in the imperial system, the user will have to choose the one that corresponds according to their case. In this example we are going to create one based on the metric system, that is why we choose the ISO template.
Note: The two templates that come by default in ARES Kudo are almost identical, except that one is designed for feet and inches (ANSI) and the other for the metric system (ISO).
What is the main difference between a DWT and DWG file?
The DWT and DWG formats are essentially identical in terms of their internal structure and content; the difference lies in their intended use and organizational function. The DWT format serves as a template, signaling to the user that it is a starting point for creating new drawings with predefined settings, such as layers, styles, and other configurations. In contrast, the DWG is the actual drawing file, commonly referred to as an "execution file," where the design work is saved.
When setting up a file to be used as a template, it is simply saved as DWT instead of DWG.
ARES Kudo provides a special directory for saving templates, separate from the traditional Save As method, for example. This offers an advantage because saving a file in DWT or DWG format within the template directory allows the user to start a new DWG drawing that will pull in information from the chosen template (whether it’s DWT or DWG). As a result, if changes are saved, they will be made to the new drawing, without affecting the template itself, regardless of whether it’s DWT or DWG.
The key takeaway is that ARES Kudo allows both DWT and DWG files to be used as templates, but it is always recommended to use the DWT format. This helps the user easily distinguish that the file is a template, in contrast to a DWG, which is expected to be used differently.
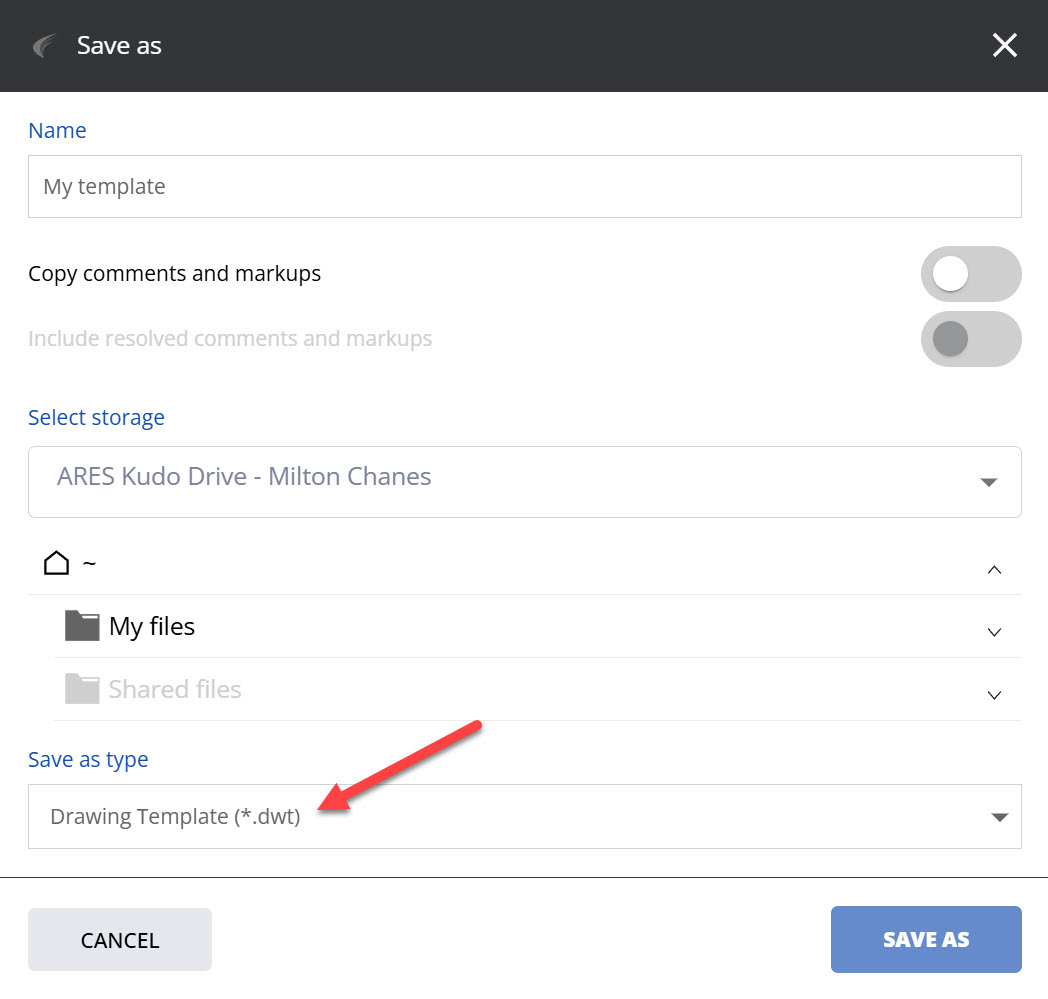
0102.03. Save as option to save the drawing in DWT format.

1. What is a template in ARES Kudo, and why should I use one?
A template is a pre-formatted drawing file (DWT) containing predefined settings like layers, dimension styles, text styles, and sheet layouts. Using templates saves time and ensures consistency across projects by providing a starting point with commonly used elements already set up. Although this answer applies to any template used in any type of CAD.
2. How do I create a new template in ARES Kudo?
- Start a new drawing and configure the desired settings: layers, dimension styles, text styles, etc.
- Save the drawing as a DWT file by selecting "Save As..." and choosing the DWT format.
- Download the DWT file.
- Upload the DWT file to your "My Templates" section in the "Resources" tab.
3. How do I transfer layers, dimension styles, and text styles from existing drawings to my new template?
- Layers: Copy at least one entity from the desired layer in the source drawing and paste it into your template. The corresponding layer will be copied along with the entity. You can then delete the pasted entity.
- Dimension styles: Copy and paste dimensions from the source drawing to the template. The associated dimension styles will be transferred.
- Text styles: Copy and paste text entities from the source drawing to the template to transfer the associated text styles.
- Blocks: When selecting a block instance or multiple instances, the block reference is also copied with it. If the block also contains elements on different layers or includes text types, dimensions, etc., everything will be copied along with the block.
Note: You can create a block to group different elements of a drawing and then copy and paste it into another drawing, allowing you to perform all actions at once.
4. Can I include pre-configured Paper Space sheets in my template?
Yes, you can create multiple Paper Space sheets within your template, each with different sizes (e.g., A4, A3) and pre-configured elements like title blocks and viewports. When starting a new drawing from the template, you can duplicate and modify the sheets according to your project needs.
5. What is the difference between saving a template as a DWG or DWT file?
Both formats can be used as templates, but DWT (drawing template) is specifically designed for this purpose. Using DWT makes it easier to identify template files and helps prevent accidental modifications to the original template.
6. How do I manage multiple custom templates in ARES Kudo?
Give each template a clear and descriptive name to easily differentiate them. Consider categorizing templates based on project type or specific needs.
7. Is it recommended to include a large number of dimension styles and other elements in a single template?
It's best to include only the most frequently used styles and elements in a template. Too many preconfigured elements can clutter the template and make it less efficient. You can always create new styles based on existing ones within your drawing as needed.
8. Are there any pre-made templates available for ARES Kudo?
By default, the program offers two templates, one preconfigured with ANSI standards and the other with ISO standards. However, within the lesson, an example template is included for download, and the lesson explains how to configure it.
- Template: A pre-configured drawing file (DWT or DWG) that serves as a starting point for new drawings. It can include pre-set layers, dimension styles, text styles, Paper Space configurations, and other elements.
- DWT format: A specific file type for saving templates in CAD. It simplifies the identification and use of predefined configurations in new projects.
- DWG format: The standard drawing format used in ARES Kudo and other CAD programs. It can also be used as a template, though DWT is more commonly employed for this purpose.
- Layer: An organizational tool that categorizes elements within a drawing. Layers can be transferred between drawings by copying entities assigned to them.
- Dimension Style: Configurations that determine the appearance and formatting of dimensions in a drawing. They can be transferred between drawings by copying dimensions associated with these styles.
- Text Style: Settings that control the font, size, and format of text in a drawing. They can be copied and transferred from one drawing to another by selecting entities that use them.
- Paper Space: An environment (in CAD’s) where you create layouts for printing or plotting your drawings. It typically includes title blocks and viewports.
- Paper Space Sheets: Preconfigured sections in a template representing different sheet sizes, such as A4, A3, and A2. These are useful for organizing projects and adding predefined configurations like title blocks.
- Block: A group of elements within a drawing that acts as a single entity. When copying a block, its references, layers, and associated styles are transferred.
- Block Reference: A link associated with a block that enables its reuse in multiple drawings while retaining its original configurations. It is in the block's part where the information is stored in the drawing's database.
- Preconfigured Title Blocks: Graphic elements containing standard project information, such as name, date, and author, which can be added to sheets in paper space.
- Insert as Block: A function that allows a complete drawing to be added as a block in another file. When doing so, layers, styles, and other elements are loaded simultaneously.
- Viewport (in sheet): A window on a Paper Space sheet that displays a specific view of the drawing from model space.
- Grid: A visible pattern in the drawing area that helps align and position elements. It can be enabled or disabled based on user preferences.
- Orthogonal Snaps: A precision tool that restricts cursor movement to 90° angles, making it easier to design elements aligned horizontally or vertically.
- Polar Snaps: A setting that guides the cursor to specific angles defined by the user, such as 30° or 45°, useful for projects with regular inclinations.
- Paste: The action of inserting previously copied elements into a drawing. It allows the transfer of layers, dimension styles, and other associated data.